
Automate Your Linux Deployment Using Azure DevOps
Feel like you have been logging into your Linux servers too much lately? Good, this might be the right article for you. In teams, either large or small manual deployments can be tedious. But they are also predictable. Deployment steps don’t really change that often unless you have a breaking change or you are implementing a major feature.

So, why don’t you just automate it? You don’t need to do it yourself. Do important things like writing code and let a machine do the deployments for you.
If your team is blessed to use Azure DevOps here is a tutorial to finally automate the hell out of your deployments. You seldom have to log on to your Linux servers again.
In this tutorial, we will be making an automated pipeline to deploy .NET Core applications to a Centos 8 server. The app will be run as a service and we will serve those services through a reverse proxy using NGINX.
Installing Azure Agent on Linux
In Azure DevOps, we use an agent to interact with our builds in the pipeline. Installing agents are straightforward, just follow these steps:
1. Setting Up A Deployment Group in Azure DevOps
Deployment groups are the list of agents already installed on your servers. You would need to make a deployment group for each server.
First, open your Azure DevOps dashboard.
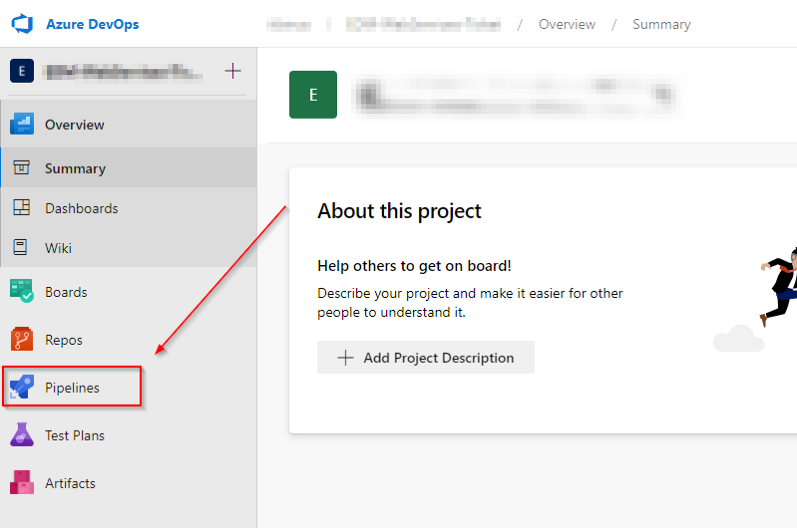
Next, open your Pipelines
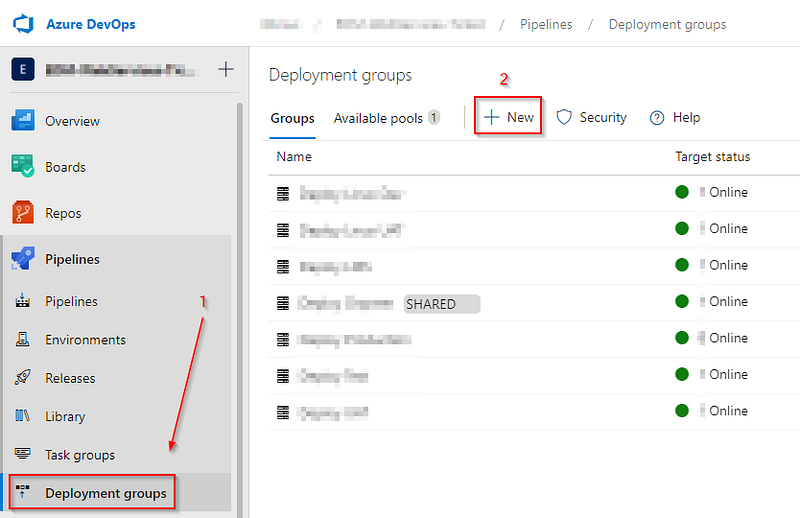
Go to Deployment Groups, and click New.

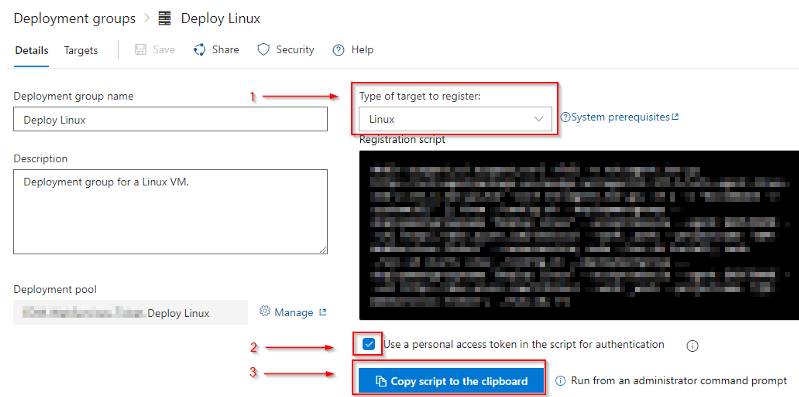
Give your Linux VM an Alias, and the description. Then click Create.
You have created a deployment group, now to install this deployment groups agent on your Linux server:
- Change the target from Windows to Linux.
- Check the Use a personal access token checkbox.
- Save the script on a notepad for the next step.
2. Installing the Agent on the Linux Server
To install the agent, run the script copied from the previous step in the home directory, make sure you run the script with a user that has sudo enabled.
After installation is finished run go into the azagent directory and check the installation by trying to run the agent:
cd azagent
./run.sh
If the agent returns a Listening for Jobs message, that means the installation was successful. The next step is to make a service that can run the agent in the background.
To start to install the agent as a service, run:
sudo ./svc.sh install
This will install the service, and then run it in the background. To stop the service run:
sudo ./svc.sh stop
Otherwise, if we want to start an installed service, run:
sudo ./svc.sh start
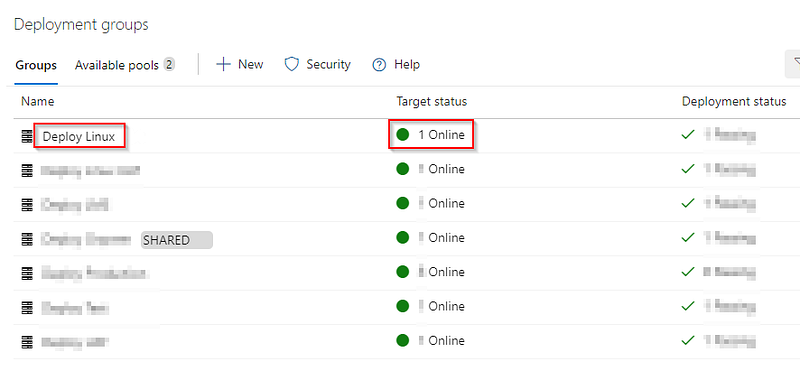
Check if the service is running by opening the Deployment Groups tab in Azure DevOps. If it is Online then your agent installation is successful and it is available for jobs.
This short installation guide was based on an article by Microsoft.
Configure your Linux server for automation
Now, this would be the fun part. Microsoft already did all the heavy lifting with the boring installation things. Now it is our turn to automate things.
1. Make a script to automate NGINX configurations
To add new NGINX configurations we will create a shell script, add this add-nginx-conf.sh script on the home directory:
#!/bin/bash
conf_path="/etc/nginx/conf.d/$1.conf"

if [ -f "$conf_path" ]
then
    conf_text=`cat $conf_path`
    if [[ "$conf_text" == *"$2"* ]] || [[ "$conf_text" == *"localhost:$3"* ]]
    then
        echo "Proxy route or localhost port has been used, please manually reconfigure your Nginx configuration."
    else
        word="\n\n\tlocation \/$2\/ {\
\n\t\tproxy_pass http:\/\/localhost:$3\/;\
\n\t}"
        match="# Insert here"
        echo "$conf_text" | sed "s/$match/&$word/g" > "$conf_path"
    fi

    nginx -t
    systemctl reload nginx
else
    conf_text="server {
	listen       80;
	listen       [::]:80;
	server_name  $1;

	# Load configuration files for the default server block.
	include /etc/nginx/default.d/*.conf;

	# Insert here

	location /$2/ {
		proxy_pass http://localhost:$3/;
	}

	error_page 404 /404.html;
		location = /40x.html {
	}

	error_page 500 502 503 504 /50x.html;
		location = /50x.html {
	}
}"

    echo "$conf_text" > "$conf_path"

    chcon unconfined_u:object_r:httpd_config_t:s0 "$conf_path"
    chown root:root "$conf_path"

    nginx -t
    systemctl reload nginx
fi
This script will create a search for configuration files named using the associated DNS, it will create a new one if it was not found. Once found, the new configuration routes will be added there. Mind you, the configuration route in this script would be a basic proxy pass, you might want to add more configurations to the script if you want to use it for production.
The shell script accepts three parameters. The DNS, proxy route, and the port being used:
sudo ~/add-nginx-conf.sh <DNS> <proxy route> <app port>
Example:
sudo ~/add-nginx-conf.sh yourdomain.com enrichment_track 14321
In this example, the script will add configurations for the yourdomain.com domain, with a reverse proxy to port 14321 in the enrichment_track.
2. Make a script to automate system service configurations
To add new system service configurations we will create a shell script, add this make-service.sh script on the home directory:
#!/bin/bash
file_path=`pwd`
service_path="/etc/systemd/system/$1.service"
if [ -f "$service_path" ]
then
    echo "Service file already exists"
else
    touch "$service_path"
    service_contents="[Unit]
Description=.NET Web API for $1

[Service]
WorkingDirectory=$file_path/_$1/drop/s
ExecStart=/usr/bin/dotnet $file_path/_$1/drop/s/$2.dll
Restart=always
# Restart service after 10 seconds if the dotnet service crashes:
RestartSec=10
KillSignal=SIGINT
SyslogIdentifier=dotnet-example
User=<user>
Environment=ASPNETCORE_ENVIRONMENT=<server environment>
Environment=DOTNET_PRINT_TELEMETRY_MESSAGE=false

[Install]
WantedBy=multi-user.target"
    echo "$service_contents" >> "$service_path"
    systemctl start $1.service
    systemctl enable $1.service
fi
Before you copy and paste the code, notice the <user> and <server environment> tags in the script. Please change it to your corresponding user and server environment beforehand. Server environments in this case would be either Development or Production.
The script will generate new systemd service files that would run .NET Core projects. To generate scripts for other types of applications you would want to change the given template.
The shell script accepts two parameters. The service name, and the project name used:
sudo ~/make-service.sh <service name> <project name>
Example:
sudo ~/make-service.sh CI-Build API-Project
In this example, the script will add a new system service file CI-Build.service, that runs a dll file named API-Project.dll.
3. Setup a user to run systemctl and Nginx commands without password prompts
For automation purposes, the user that you used to install your Azure Agent needs to be able to run systemctl and Nginx commands without a password prompt. To remove the password prompts on sudo run:
sudo visudo
We need to run all the commands in the script using sudo without having a password being prompted. So, we make exceptions for those commands, and the corresponding scripts we are going to use.
Then add this on the last line (change the <user> tag beforehand):
<user> ALL=(ALL) NOPASSWD:/usr/bin/systemctl, /usr/sbin/nginx, /usr/bin/chcon, /usr/bin/chown, /usr/bin/echo, /usr/bin/touch, /usr/bin/sed, /home/<user>/make-service.sh, /home/<user>/add-nginx-conf.sh
Exit and save the config file, then try running one of these commands using sudo. You should not be prompted for a password.
A full explanation on how to run a sudo command without a password can be seen here.
Prepare the Pipelines
Prepare the CI Pipeline
In this tutorial, we are going to use a .NET Core app as our example.
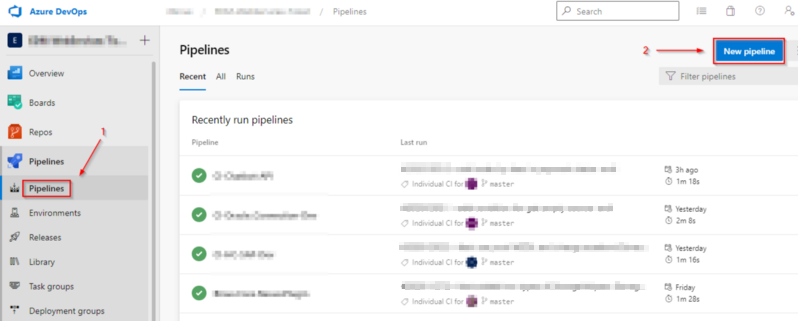
- First, go to the Pipelines tab.
- Click New Pipeline.
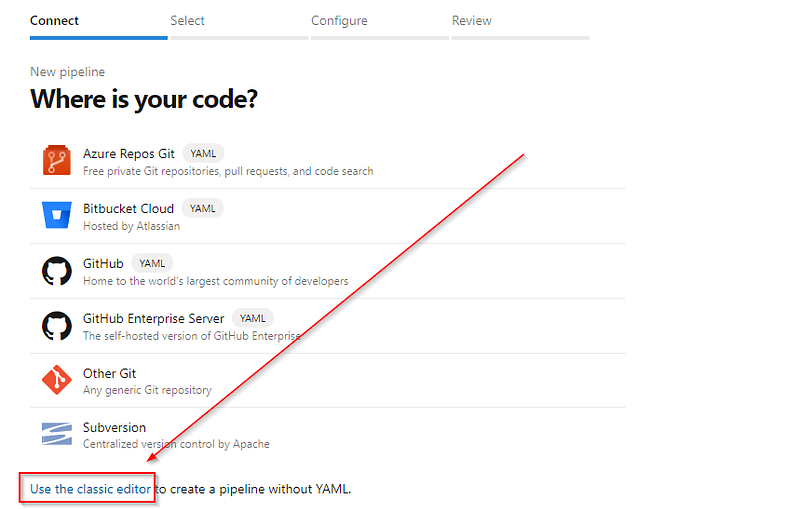
Use the classic editor.
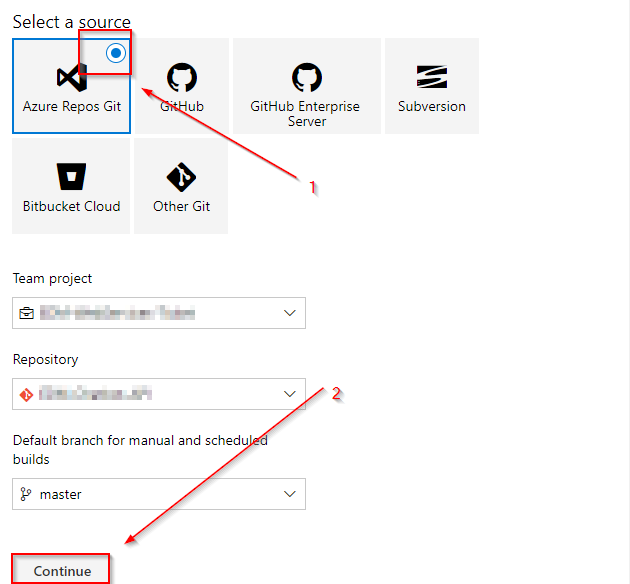
Choose a repository and click Continue.

Apply the .NET Core template.
- Search for “.NET Core”.
- Then apply the template
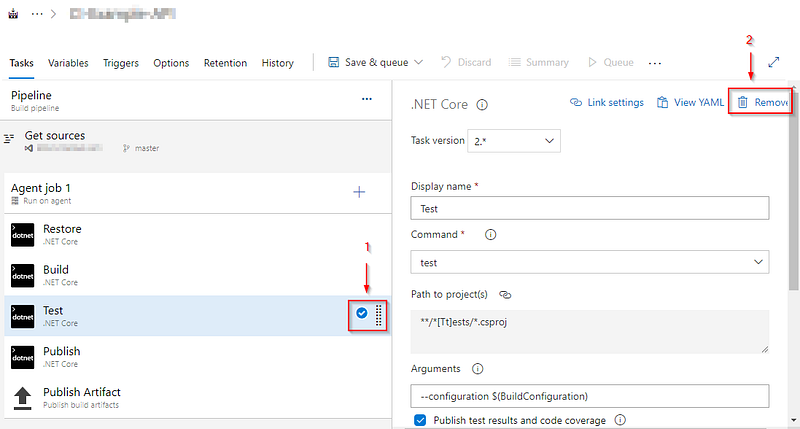
Because we are deploying a very small example app, I didn’t prepare any tests so:
- Click the Test task.
- Remove the task.
Otherwise, if you are using tests, then don’t remove this task.
Finally, this is what you are left with. In the next step, we will implement Continuous Development in our solution.
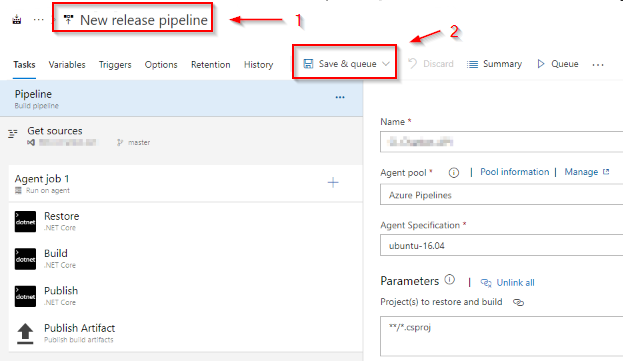
- Change the name of your CI pipeline.
- Save the Pipeline.
Prepare the CD Pipeline
To add a new Continuous Development pipeline:
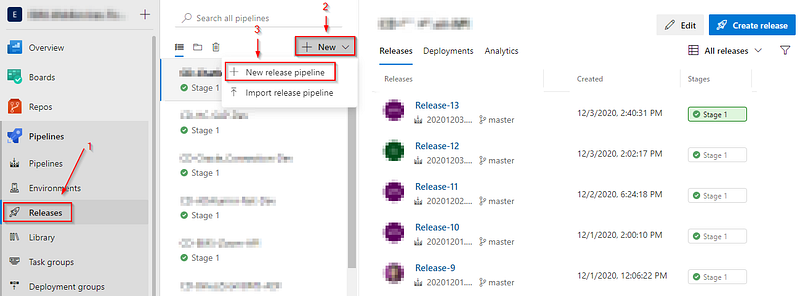
- Go to the Releases tab.
- Click the New.
- Then click New release pipeline to create a new pipeline.
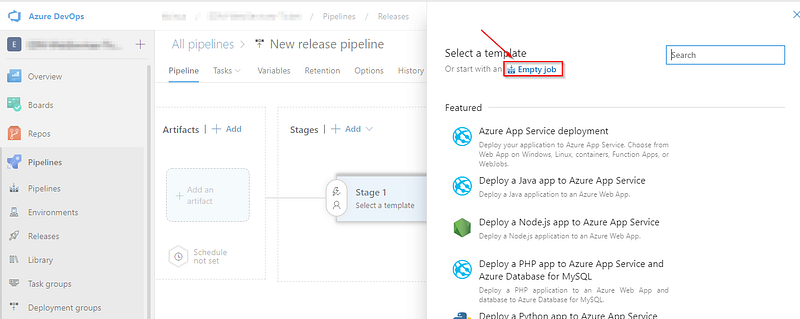
After clicking the New release pipeline button a pop-up will appear, then select Empty Job.
To connect to a CI pipeline:
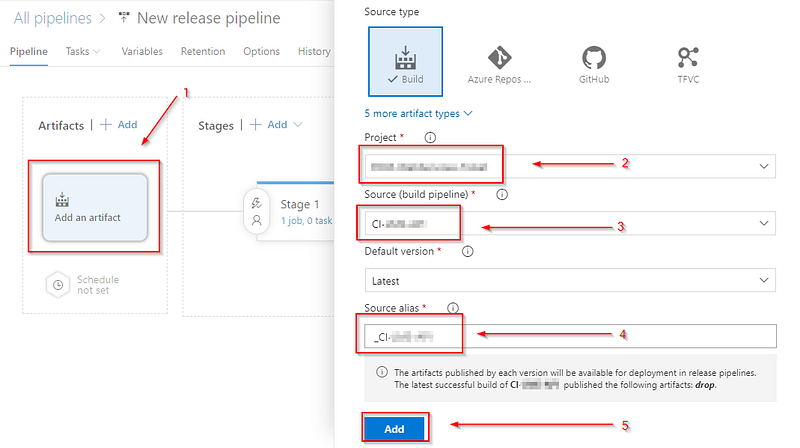
- Click Add a new artifact.
- Choose the project that contains the CI pipeline.
- Choose the CI pipeline.
- Give an alias to your artifact.
- When all is done click Add to finish the configuration.
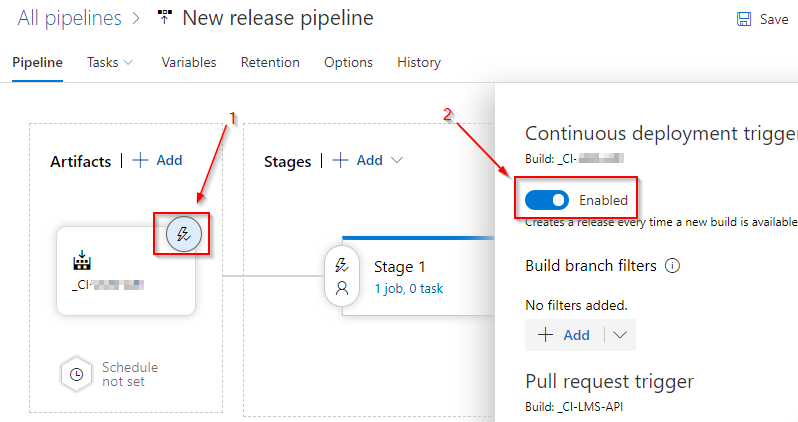
Then for the Continuous Deployment pipeline:
- Click the thunderbolt icon.
- Then check the Enabled button.
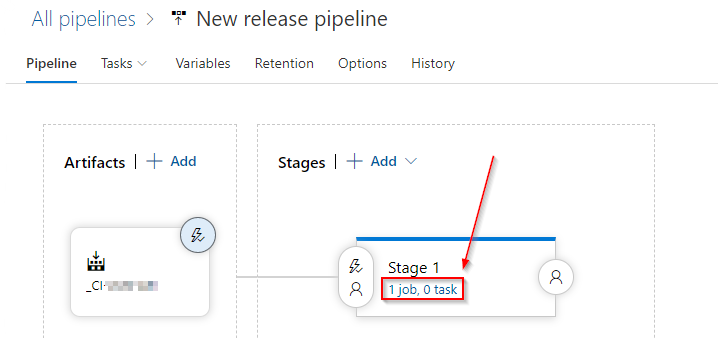
After creating a stage, on stages, double click on tasks to go to the Tasks section.
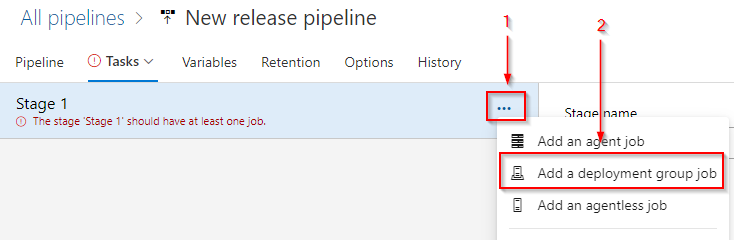
In the tasks section, make a deployment group job.
- Click the three dots to show options.
- Add a deployment group job.
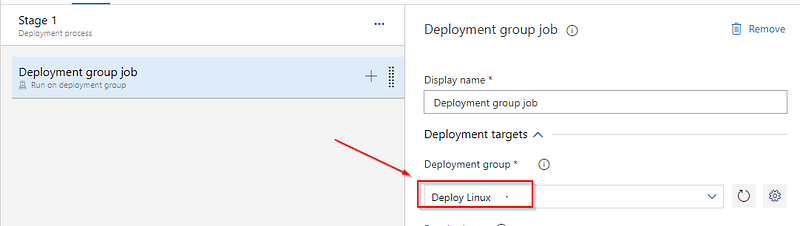
Choose the Linux deployment group we made on this step.
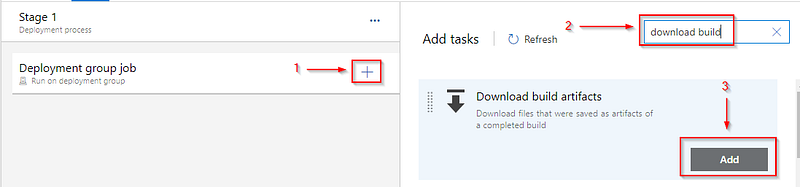
Add a task to the deployment job.
- To add a new task click the + sign.
- Then search for Download build artifacts. This task is to download artifacts from the CI pipeline to the Linux VM.
- Finally, Add the task.

Next is to configure your Download Build Artifacts job. Follow these 6 steps.
- Click the Download Build Artifacts task.
- Choose to download artifacts by Specific Build.
- Define your Azure DevOps project
- Define your CI pipeline.
- Check the When appropriate download artifacts from the triggering build checkbox to trigger a download only after the build is finished.
- As for the download, type choose Specific files.
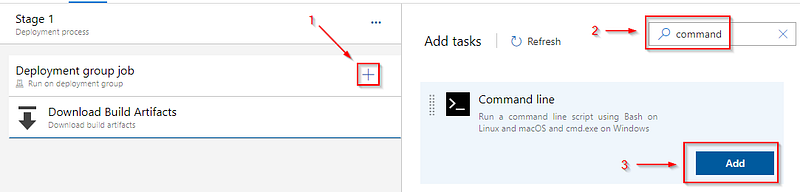
Then search for the Command line task:
- Create a new task by clicking the + button.
- Search for “command”.
- Click Add to add a new task to the existing job.
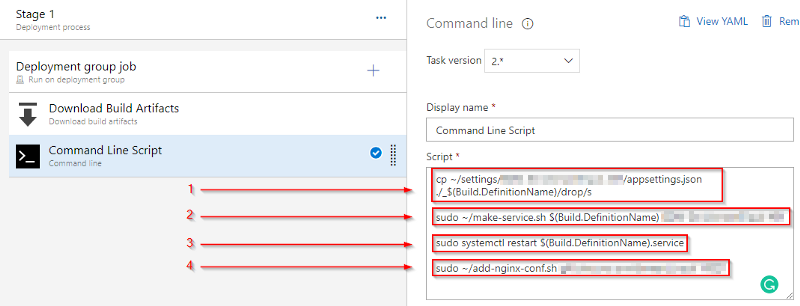
Then in the command line, paste in the script you will be running:
- Copy the appsettings.json file from the home directory to the build folder.
- Generate system service configuration files and start if not exist using the make-service.sh script.
- Restart the service for the .NET Core project.
- Add NGINX configuration if not exist using the add-nginx-conf.sh script.
Notice in the command line, there are tags like $(Build.DefinitionName). This is one of Azure Pipeline’s pre-defined variables you can learn more about it here.
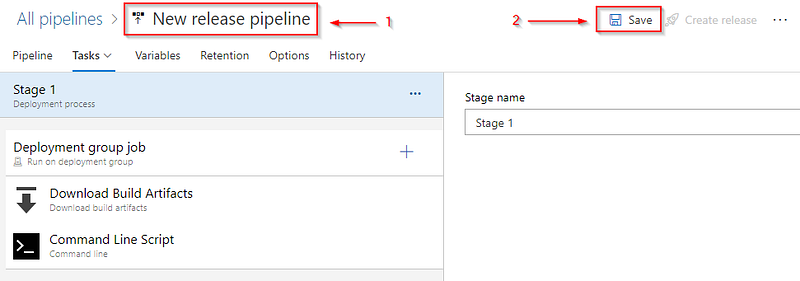
After you’re done with the configuration, save your Release pipeline:
- Change the name of the Pipeline
- Save the pipeline.
Testing the pipeline
To test the pipeline, go to the Pipelines section, open the pipeline you just created, and click Run Pipeline.
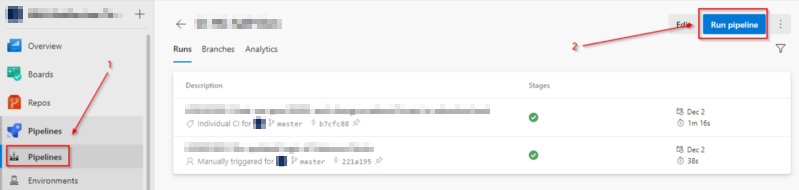
We run it from the CI pipeline because both CI and CD pipelines are already connected.
Summary
In this tutorial, you have learned how to automate CI/CD deployments using Azure DevOps and some shell scripts. We tested it out using a .NET Core project. The Linux server used was a Centos 8.
To recap what we have done:
- Installed an Azure Agent on Linux.
- Configured our Linux server for automation.
- Prepared the CI/CD Pipelines.
You now have an open playbook to use when you want to automate deployments. Hope this tutorial was of help and have a nice day!