
Setting Up A Multinode RabbitMQ Cluster On Linux
Installing RabbitMq on multiple remote servers can be a hassle. To connect multiple instances into one cluster we must first install RabbitMq on each remote server. These next two steps will walk through how we can install RabbitMq instances.

In this tutorial, we will be installing RabbitMq using a Centos 8 Linux distro. The RabbitMq version used in this tutorial is 3.8.9.
What is clustering for?

Well, clustering is used to combine multiple instances of RabbitMq into one giant central message queue. Clustering can be done on remote instances of RabbitMq on different servers. The purpose of the cluster is to handle massive amounts of message queues from apps, balancing the load on multiple servers rather than on a single server.
Add the required dependencies
Install the required repositories
Add the RabbitMq repository in the repo configurations file. Open the config file:
sudo vi /etc/yum.repos.d/rabbitmq-server.repo
Add this to the lines below:
[rabbitmq-server]
name=rabbitmq-server
baseurl=[https://packagecloud.io/rabbitmq/rabbitmq-server/el/7/$basearch](https://packagecloud.io/rabbitmq/rabbitmq-server/el/7/$basearch)
repo_gpgcheck=1
gpgcheck=0
enabled=1
gpgkey=[https://packagecloud.io/rabbitmq/rabbitmq-server/gpgkey](https://packagecloud.io/rabbitmq/rabbitmq-server/gpgkey)
sslverify=1
sslcacert=/etc/pki/tls/certs/ca-bundle.crt
metadata_expire=300
Add Hostname to the hosts file
RabbitMq is built on top of Erlang. So it would make sense for us to install it beforehand. This part is very crucial as if you do not ad the hostname to /etc/hosts then rabbitmqctl status will not work.
echo “127.0.0.1 $(hostname -s)” | sudo tee -a /etc/hosts
Setting Up RabbitMq Server
Install RabbitMq Server
After completing the previous configuration setup steps, install RabbitMq by using this command:
sudo dnf install -y rabbitmq-server
After installation is completed, check if the installation is correct by running:
rpm -qi rabbitmq-server
Open Ports
Centos has a pre-installed firewall called firewalld. It blocks all ports from connecting unless asked to. So we must whitelist the TCP ports that are going to be used by RabbitMq.
sudo firewall-cmd --zone=public --permanent --add-port={5672,15672}/tcp
sudo firewall-cmd --reload
Start the RabbitMq service
The RabbitMq service doesn’t start on its own when you install it. You have to start it manually, then enable it to run on server startup. To start the RabbitMq service (the service might take a minute or two to start):
sudo systemctl start rabbitmq-server.service
To enable the service run:
sudo systemctl enable rabbitmq-server.service
To check if the service is still running:
sudo rabbitmqctl status
Enable RabbitMq Management
If you want to enable the RabbitMq admin dashboard, run:
sudo rabbitmq-plugins enable rabbitmq_management
Then try to open the dashboard from the browser:
http://*your-server-ip*:15672
Setting Up RabbitMq Cluster
After setting up RabbitMq on multiple servers (minimum of 2 servers) we now can continue to set up instances for the master and slave nodes. Choose one server as the master node as the cluster host, then use the other nodes as a slave cluster.
Setting Up The Master Node
Whitelist the TCP port 4369 for epmd, a helper discovery daemon used by RabbitMQ nodes and CLI tools, and port 25672 for instance finding.
sudo firewall-cmd —-zone=public —-permanent —-add-port={4369,25672}/tcp
sudo firewall-cmd —-reload
Add the hosts for each cluster, in the /etc/hosts file
sudo vi /etc/hosts
In the hosts file add the IP and hostname for each instance. The configuration would be as follows:
node 1 IP node 1 hostname
node 2 IP node 2 hostname
node 3 IP node 3 hostname
The order doesn’t have to be master first, but it does need to have all cluster IPs and hostnames for it to work. An example configuration is as follows:
10.240.200.111 rabbitmq-1
10.240.200.112 rabbitmq-2
10.240.200.113 rabbitmq-3
Get the .erlang.cookie from the master node
sudo cat /var/lib/rabbitmq/.erlang.cookie
Save the token output in your notepad.
Setting Up The Slave Nodes
Whitelist the TCP port 4369 for epmd a helper discovery daemon used by RabbitMQ nodes and CLI tools, and port 25672 for instance finding.
sudo firewall-cmd —-zone=public —-permanent —-add-port={4369,25672}/tcp
sudo firewall-cmd —-reload
Add the hosts for each cluster, in the /etc/hosts file
sudo vi /etc/hosts
In the hosts file add the IP and hostname for each instance. The configuration would be as follows:
node 1 IP node 1 hostname
node 2 IP node 2 hostname
node 3 IP node 3 hostname
The order doesn’t have to be master first, but it does need to have all cluster IPs and hostnames for it to work. An example configuration is as follows:
10.240.200.111 rabbitmq-1
10.240.200.112 rabbitmq-2
10.240.200.113 rabbitmq-3
Stop the rabbitmq-server instance and replace the .erlang.cookie inside the slave node with the masters.
sudo su
systemctl stop rabbitmq-server
echo -n “*erlang cookie from master node*” > /var/lib/rabbitmq/.erlang.cookie
systemctl start rabbitmq-server
Repeat this setup on all the nodes!
Join The Slave Nodes With The Master Node
Stop the rabbitmq-server instance, reset the node and join it with the master node.
sudo rabbitmqctl stop_app
sudo rabbitmqctl reset
sudo rabbitmqctl join_cluster rabbit@*master node hostname*
sudo rabbitmqctl start_app
Reset The Master Node
Reset the rabbitmq-server in the master node.
sudo rabbitmqctl stop_app
sudo rabbitmqctl reset
sudo rabbitmqctl start_app
Check The Cluster Status
To check the cluster status, run this command:
sudo rabbitmqctl cluster_status
Conclusion
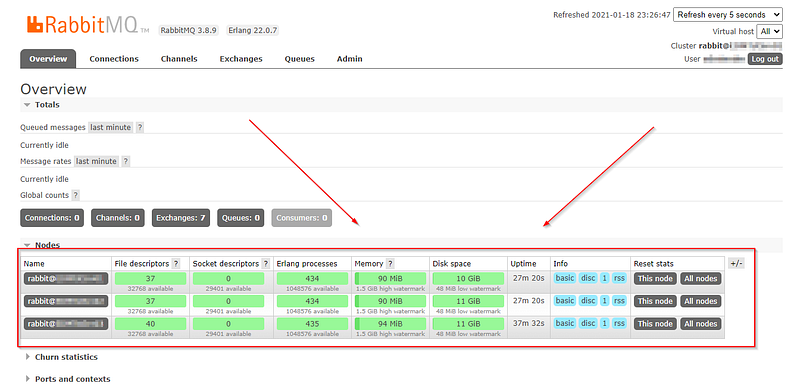
In the end, when we have finished installation, login to the RabbitMq management dashboard for one of the nodes and it would have more than one cluster like so:
Of course, there are advantages in using manual installs for RabbitMq. The pros would be:
- You can save space on each server by only installing RabbitMq and nothing else.
- Particularly on VMs, you can use Ansible to speed up the installation process by doing the repeatable tasks from a single command line.
- You understand thoroughly the process of building a RabbitMq instance from the ground up.
Then the cons would be:
- Managing the firewalls for each server can be complicated.
- It is faster for us to use Docker during container set up for each server.
But if you want to read more on this topic, and read some of the references I had when making this tutorial you can check out these links below:
- Official RabbitMQ Clustering Guide.
- How to Install RabbitMQ on RHEL 8 / CentOS 8 — Linux Windows and android Tutorials (osradar.com).
- How to config rabbitmq server cluster [3 nodes] (github.com).
Now we have an open playbook for you to use the next time you want to setup RabbitMq on your systems manually.